Automating repetitive keyboard key presses or spacebar taps on Windows does not require writing scripts or learning code. In RunMacro 2.2.9, you construct an automated keyboard loop directly on the visual canvas by combining two core commands: Delay and Key Press, controlled by the Studio outer Loop. This setup sends simulated keystrokes to your active window at the pacing interval you define.
Whether you need to repeat a single function key during software testing, keep a form stepping forward with Enter or Tab, or simulate continuous Spacebar taps, this guide walks through the exact visual setup, execution controls, and operating system boundaries you need to understand.
F9 stop hotkey ready (or customize to ESC / F12 in Settings). For Chrome web forms, use Smart HTML instead to run in background Chrome without hijacking your keyboard.Who should use this and when to avoid it
Automating single keystrokes is a practical solution for specific, rule-based workflows, but it is not the right tool for every automation task.
🟢 When to use key loops
• Repetitive single-key actions: Automating repeated taps of the Spacebar, Enter, Tab, arrow keys, or function keys (F1–F12).
• Periodic software stepping: Advancing through fixed desktop dialogs, sequential form rows, or paginated lists where pressing Enter or Tab progresses the state.
• Fixed-interval UI testing: Testing desktop application responsiveness under steady, simulated key inputs during quality assurance.
• Continuous pacing tasks: Sending an occasional keep-awake key or periodic key trigger into an active development utility or monitoring tool.
⚠️ When to use alternatives
• Typing dynamic phrases or multi-character text: If you need to fill sentences, dates, or variable customer information, do not loop single key presses. Use the Type Text command instead, or bind fields to variables.
• Targeting web forms inside Google Chrome: If your task lives inside a browser page, sending desktop keystrokes is brittle and hijacks physical focus. Switch to Browser Mode using Chrome DevTools Protocol (CDP) and Smart HTML actions, which interact directly with web elements in the background without stealing your cursor.
• Automating inactive or minimized desktop windows: RunMacro Desktop Mode cannot send keystrokes to windows running in the background or minimized to the taskbar. Desktop keystrokes require active window focus.
• Bypassing administrative boundaries: Automated keyboard loops cannot circumvent operating system security policies or administrative access restrictions.
Preparation: what you need before building
Before setting up your first keyboard loop, prepare your workstation with the following requirements:
• RunMacro 2.2.9 Public Release or later: Installed and running on Windows 10 or Windows 11 (64-bit).
• A safe test target application: Open a blank Notepad document (notepad.exe). Testing on a blank document allows you to see keystrokes appear immediately without risking accidental data loss or menu triggers in production software.
• Appropriate privileges: If your target program runs with Administrator privileges (elevated), launch RunMacro via Run as Administrator as well. Windows security prevents non-elevated software from sending input into elevated windows.
• Execution controls in mind: Know your assigned pause hotkey (F8) and stop hotkey (F9).
Step-by-step: building an automated key loop in Studio
Follow these six steps to build, configure, test, and control an automated keyboard loop on Windows:
Step 1 — Add the Delay command
Every reliable input loop must include a pacing delay between keystrokes. Without a delay, simulated inputs can overwhelm the target application's message queue, causing dropped characters or application freezing.
In RunMacro Studio, locate the Flow command group in the left toolbox, then drag a Delay block onto your canvas:
• Default pacing: Set the duration to 200 ms for general form stepping or UI responsiveness testing.
• Rapid pacing: For quick key repetitions, you can reduce this value to 50–100 ms, but test thoroughly to confirm your target window does not drop inputs.
• Relaxed pacing: If the target application takes time to process each step (such as submitting an item or refreshing a screen), set the delay to 500 ms or higher.
Step 2 — Add the Key Press command
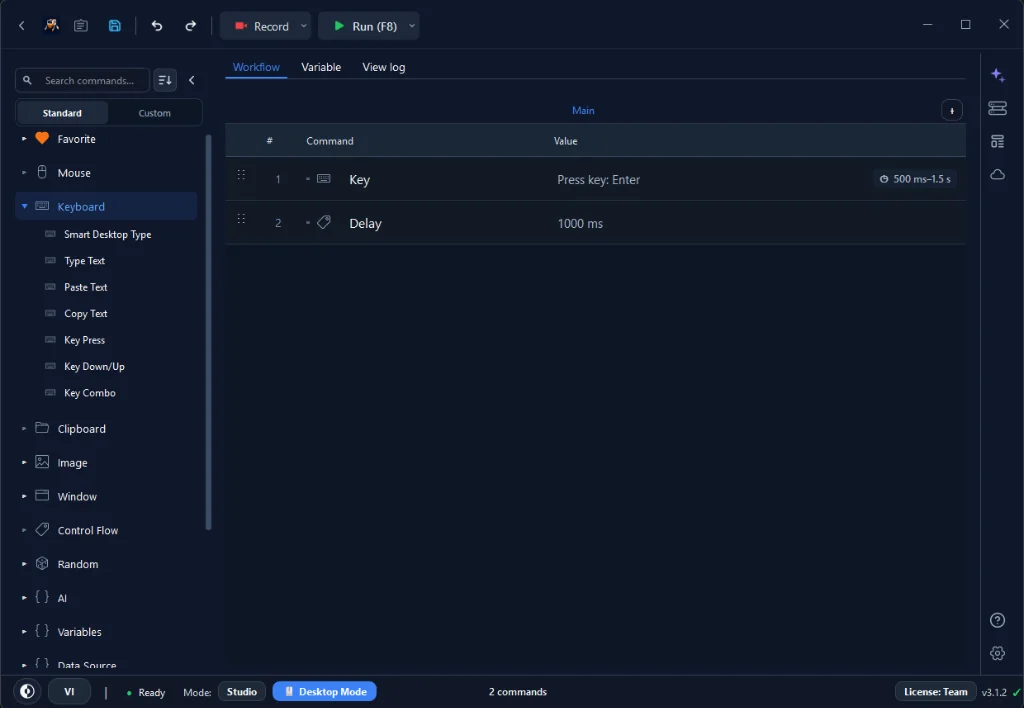
Next, locate the Keyboard group and drag a Key Press command immediately after your Delay block.
Open the command properties panel to configure the key:
• Key Selection: Choose the key you wish to simulate. For spacebar automation, select Space. For form navigation or submission, select Enter or Tab. You can also pick any standard virtual key, such as F5, Down Arrow, or alphanumeric characters.
• Action Type: Leave the action set to standard tap (press and release), which simulates a natural mechanical keystroke.
| Action | Key Examples | RunMacro Command |
|---|---|---|
| ⌨️ Single Press (Tap) | Enter, Space, Tab, F1–F12 | Key Press |
| ⏳ Hold & Release | Hold movement keys in apps or games | Key Down → Key Up sequence |
| ⚡ Key Combo | Ctrl + S, Alt + Tab, Ctrl + V | Key Combo |
| 📝 Type Text | Names, email addresses, dynamic strings | Type Text or Paste Text |
Step 3 — Configure the Studio outer Loop
Rather than duplicating commands on the canvas dozens of times, use Studio's built-in execution loop control located on the top toolbar:
• Bounded Execution (N cycles): Enter a specific number (such as 5 or 10) in the Loop field. RunMacro will execute the sequence exactly that many times and then stop automatically.
• Continuous Execution (0): Setting the loop count to 0 enables indefinite looping. The workflow will repeat the sequence continuously until you manually pause or stop execution.
For your initial setup, always set a bounded count (such as 5) so you can observe the run without needing to intervene immediately.
Step 4 — Focus the target window
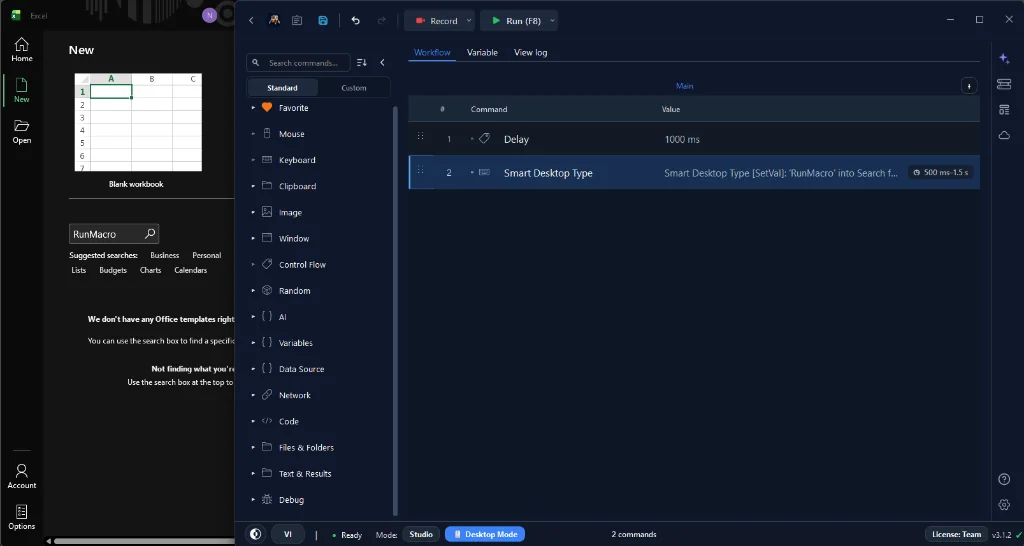
Because RunMacro Desktop Mode dispatches virtual key messages directly through Windows input APIs, it sends keystrokes exclusively to whichever window currently holds active desktop focus.
Click inside your blank Notepad document to position the blinking cursor inside the text area. Keep this window in the foreground. If you click away or minimize Notepad, simulated keystrokes will be directed to whatever other window takes focus.
Step 5 — Run a small initial test
Click the Run button in Studio or press your assigned start hotkey. Within half a second of delay, switch focus to Notepad:
• Watch the blinking cursor in Notepad.
• Confirm that each key press produces the expected character or space at your configured interval.
• Verify that Studio increments its loop counter and terminates cleanly after your designated iteration count finishes.
Step 6 — Control execution with Hotkeys
When running continuous keyboard loops, keep the configured pause and stop controls available without needing to hunt for the Studio window:
• Default Pause / Resume Hotkey: Press F8 to temporarily suspend keystroke simulation. Press F8 again to resume where the macro left off.
• Default Stop Hotkey: Press F9 to request that the running workflow stop. Wait until Studio reports that execution has ended before changing the target.
Both hotkeys are globally registered and fully configurable in RunMacro Settings > Hotkeys.
Space key, do not set Space or any shortcut involving Space as your stop trigger. Doing so creates an input conflict where the simulated keystroke could unintentionally trigger or block your hotkey listener.Handling modifiers, hotkeys, and shortcuts
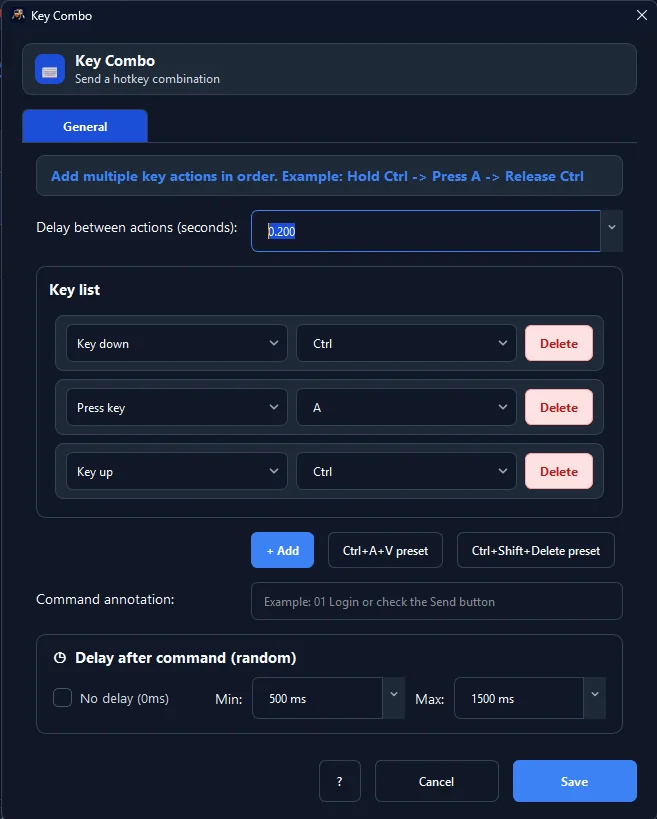
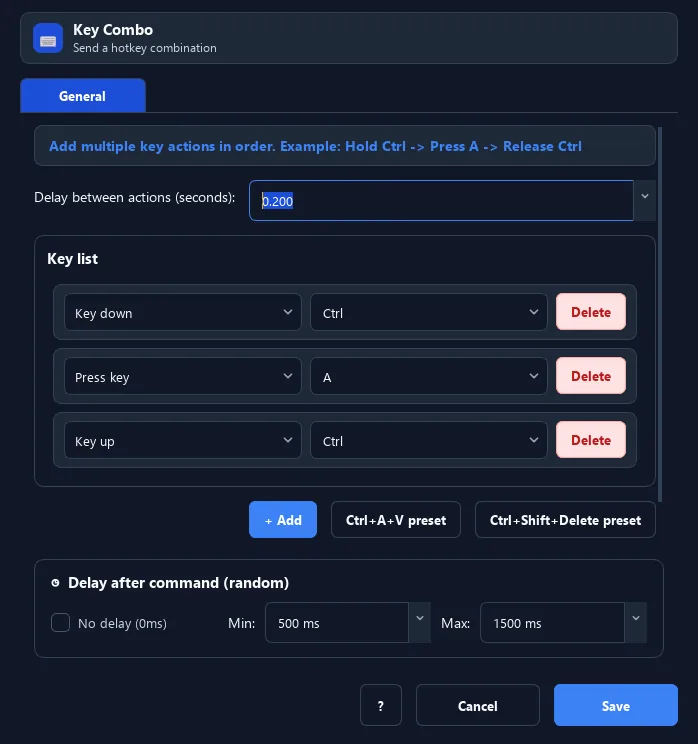
When your workflow requires multi-key shortcuts such as Ctrl + A, Ctrl + C, or Alt + Tab, use the Key Combo command. The Key Combo settings panel allows configuring exact press and release sequences with anti-detection random delay intervals between actions.
Expected results and the reality of timing
When your workflow runs as designed:
• Visible output: Characters or spaces appear in the focused application at the pacing interval determined by your Delay setting.
• Visible run state: Studio indicates whether the workflow is running, paused, stopping, or idle.
• Controlled termination: Pressing the configured stop hotkey requests a stop; confirm that Studio is idle before using the target normally.
Understanding timing precision on Windows
It is essential to understand that desktop automation pacing is governed by the Windows operating system thread scheduler and internal timer resolution (typically 10 ms to 15.6 ms on standard Windows installations).
When you set a 200 ms Delay, RunMacro requests a 200 ms thread sleep. The actual elapsed time between simulated keystrokes will be approximately 200 ms, fluctuating slightly based on background CPU activity, thread priorities, and system load. This pacing is suitable for ordinary workflow timing, but it does not provide sub-millisecond hardware-clock guarantees or microsecond precision.
Technical boundaries and Windows operating system limitations
Desktop keyboard simulation interacts directly with Windows security subsystems. Understanding these boundaries ensures your automations run smoothly without unexpected stops:
| Technical Boundary | Root Cause | Solution & Workaround |
|---|---|---|
| UAC Elevation (Admin) | Target app runs as Administrator while RunMacro runs at standard privilege (UIPI isolation) | Launch RunMacro via *Run as Administrator* with matching privilege |
| Windows Secure Desktop | OS security blocks simulated input on login, lock screen (Win + L), or darkened UAC prompts | Keep desktop unlocked before running; automation cannot type into Secure Desktop |
| Raw-Input & Anti-cheat | DirectInput or protected games/engines intercept simulated OS keystrokes at the kernel level | Comply with software terms; desktop simulation cannot and should not bypass anti-cheat systems |
| Web forms & cursor theft | Desktop Mode requires active foreground focus, hijacking physical typing | Switch to Browser Mode using Chrome CDP and Smart HTML for silent background execution |
User Account Control (UAC) elevation barriers
Windows enforces User Interface Privilege Isolation (UIPI). A process running at standard user privileges cannot inject input messages into a process running with elevated Administrator privileges. If the target application is elevated while RunMacro is not, simulated input may be ignored. Follow your organization’s security policy and use matching privilege levels only when authorized; automation cannot operate on the UAC credential prompt itself.
Windows Secure Desktop
Windows strictly isolates the Secure Desktop to prevent credential theft. Simulated keystrokes cannot function on Windows login screens, lock screens (Win + L), or the darkened UAC prompt dialog. Operating system security prevents any non-system software from simulating input in these contexts.
Raw-Input and protected applications
Some applications use raw-input paths or protected input handling that does not accept ordinary simulated Windows keystrokes. These targets may ignore some or all automated key events.
Desktop Mode vs Browser Mode
Remember that Desktop Mode requires active window focus. If you need to automate web forms or browser actions in Google Chrome without losing the ability to use your computer, consider Browser Mode. In Browser Mode, RunMacro dispatches keyboard events directly inside the Chrome tab via the Chrome DevTools Protocol (CDP), allowing you to interact with web elements while the window remains in the background. For native Windows software, our specialized Auto Keyboard solution explains the focused-window method and its capabilities.
Troubleshooting common issues
If your keyboard automation does not behave as expected, reference this table for common causes and direct solutions:
| Issue / Symptom | Root Cause & Solution |
|---|---|
| No characters appear in target | Ensure the target window is active and the text cursor is blinking inside an editable field. Verify if the target application runs as Administrator (launch RunMacro as Admin if so). |
| Keystrokes skipped or clustered | The target application's message queue cannot keep pace with rapid inputs. Increase the Delay interval (e.g., from 50 ms to 250 ms) to give the UI time to process each event. |
| Stop hotkey not responding | Verify the configured stop key (F9 by default). If another background software intercepts F9, customize it to ESC or F12 in RunMacro Settings > Hotkeys. |
| Target window loses focus | Windows sends desktop keystrokes to whatever application jumps to the foreground. Turn off system popups or notifications, and maximize the target window during long automation sessions. |
| Keystrokes sent to wrong window | Focus shifted unexpectedly during execution. Switch to Browser Mode with Smart HTML for browser tasks to target elements by CSS/XPath without needing focus. |
Conclusion and next steps
Automating repetitive keyboard key presses on Windows is straightforward with RunMacro 2.2.9. By combining a Key Press block with a pacing Delay and managing iterations through the Studio outer Loop, you can automate spacebar taps, form stepping, and function key routines reliably without writing code.
For advanced automation workflows—including conditional logic, variable injection, image recognition, and packaged runner deployment—explore our dedicated Auto Keyboard solution or record complete desktop routines with our Windows macro recorder.
Ready to automate your desktop workflows? Download RunMacro for Windows to build, test, and deploy reliable Windows automations today.