

IIf your job involves submitting the same Google Form over and over — surveys, event sign-ups, order entry, lead generation, or test data — you know the feeling of spending substantial time filling in the same fields repeatedly. Worse, most automation tools take over your mouse and keyboard, turning your PC into a no-go zone for as long as they run. This guide shows a different approach to automated form filling with RunMacro: the whole fill-and-submit workflow runs inside a background Chrome window, while you keep using the same computer normally — writing documents, joining calls, or browsing the web.
It is a complete, start-to-finish guide. You will see the two ways to auto-fill a Google Form, a step-by-step workflow you can copy, how to feed different data into each submission, how to handle every field type Google Forms uses, the mistakes people run into, a troubleshooting checklist, and a FAQ at the end.
What automated Google Form filling actually solves
Filling forms by hand has three built-in weaknesses. Speed: each form takes anywhere from a few seconds to a few minutes, and across a large batch that manual time adds up quickly. Accuracy: the longer you work, the easier it is to mistype an email, skip a required field, or pick the wrong option. Repeatability: when you need to run it again next week, you start from scratch.
An automated workflow fixes all three. It fills in exactly the same way every time, runs faster than a person, and can be reused whenever you need it. The fourth factor — the one this guide keeps coming back to — is making that happen quietly in the background, without commandeering the machine you rely on for real work.
Two ways to auto-fill a Google Form
RunMacro gives you two routes, and the right one depends on how often you run the form and whether the data changes.
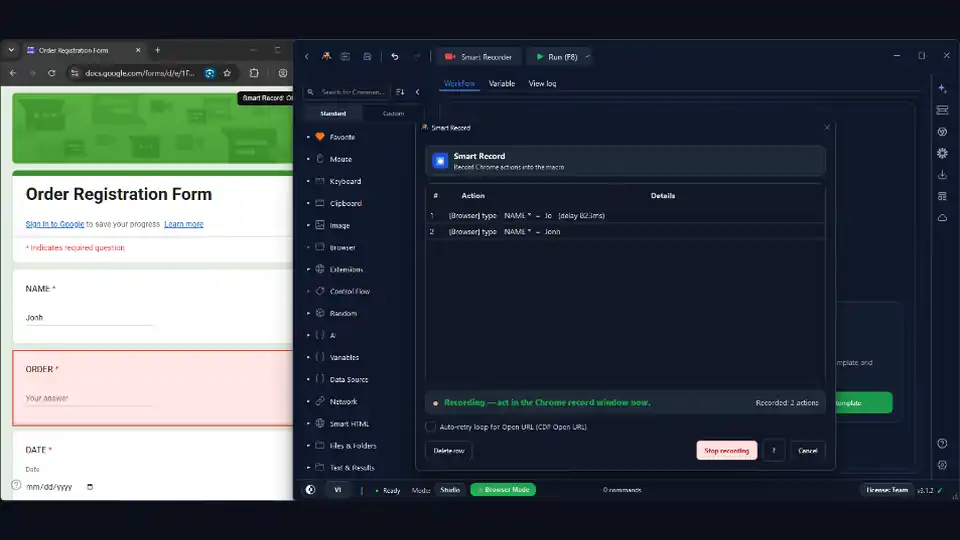
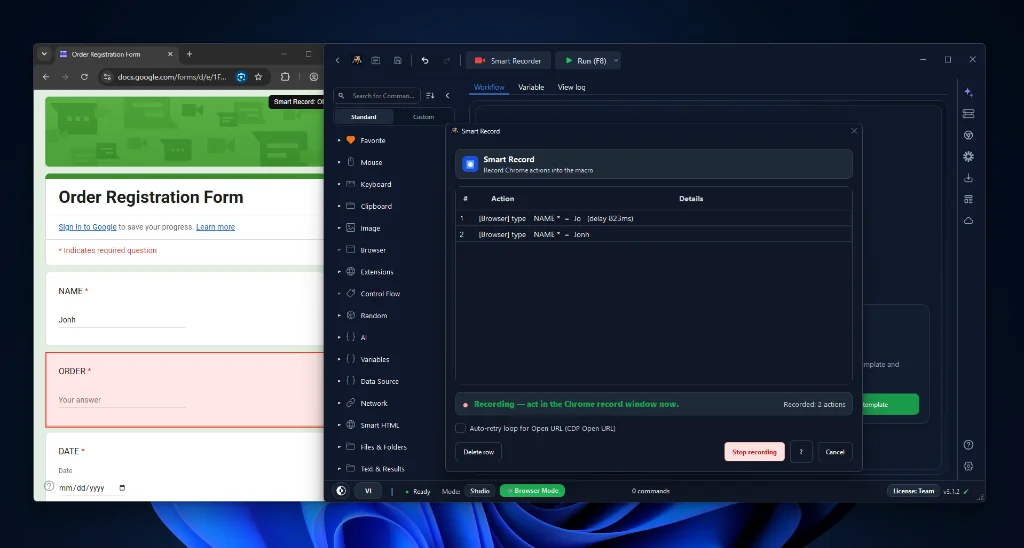
Record and replay is the fastest way to automate a form you fill the same way each time. Use Smart Record to capture yourself opening the form, clicking options, and typing answers once; RunMacro turns those actions into a workflow you can replay on demand. This suits a fixed weekly report or a status form where the answers rarely change.
Build a data-driven workflow is the route for volume. You assemble the steps yourself — open, wait, fill, submit, verify — and feed a spreadsheet in so each run submits a different set of answers. This is what the rest of the guide focuses on, because it scales from one submission to a thousand without extra work.
Both routes run in the same background Chrome, so neither one takes over your screen.
Why 'running in the background' is the difference that matters most
Most auto-click software works by driving the real cursor on screen. While it runs, the mouse darts around, windows pop in and out, and you can barely do anything else. Want to use the machine? You have to stop the workflow.
RunMacro's Background mode (Chrome/CDP) follows a completely different mechanism. Instead of moving a physical mouse, it drives Chrome directly through the DevTools protocol (CDP) — issuing commands straight to the browser, such as 'click this button' or 'type into that field', at a lower level. A background Chrome window handles every action while your physical mouse and keyboard stay free. That is exactly why you can let a workflow submit forms and do other work at the same time — something coordinate-based auto clicking can never manage.
What you need before you start
To follow along you need RunMacro installed on Windows, the Chrome browser, the link to the Google Form you want to fill, and — if each submission needs different data — a CSV/Excel file or a Google Sheet with your rows. If you are brand new, read the guide to building your first workflow to get familiar with the interface first.
One more thing worth checking before you build: open the form yourself once and note which questions are required, whether it spans multiple pages, and whether it collects email addresses or limits responses to one per account. Those details decide how many steps your workflow needs.
If the form requires a Google sign-in, or limits responses to one per account, run it in a dedicated Chrome CDP profile that is already signed in to the account you want — the background session carries that login with it. When you need to submit as several accounts, give each its own signed-in profile rather than sharing one.
How to build a Google Form auto-fill workflow, step by step
Step 1 — Open the form in background Chrome
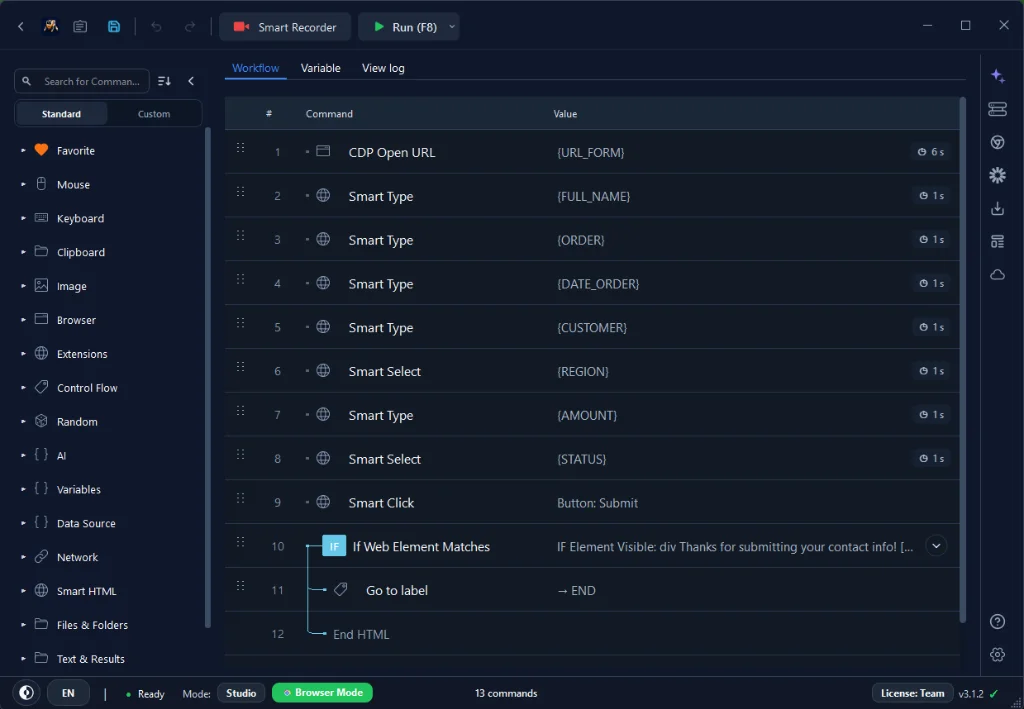
Add an Open URL command and paste your Google Form link. Because this runs in background Chrome, the browser steps run through the selected background Chrome/CDP session without using the physical mouse or keyboard. Select Browser Mode for the workflow so every following action is dispatched into that Chrome window over CDP.
Step 2 — Wait for the form to load
Do not start filling the moment the page opens. Add Wait for element pointing at the first input field to be sure the form has finished rendering. This is the step most beginners skip, and it is the one that causes 'typing into the void' errors. On a slow connection, waiting for a real element is far more reliable than guessing with a fixed delay.
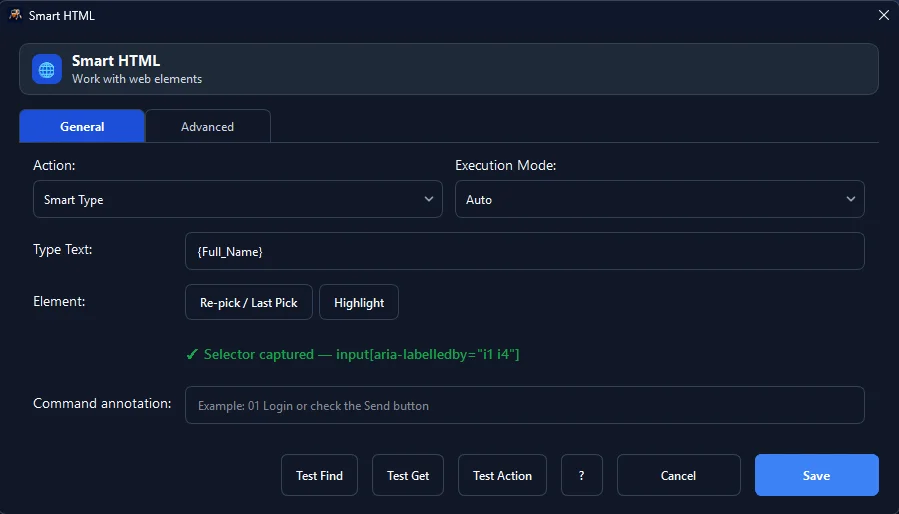
Step 3 — Target each field by selector
Use Smart HTML element actions to target each field and enter its value. Rather than memorizing CSS, use RunMacro's element picker to click the field in the page and let it capture a selector for you. Targeting by selector instead of by screen coordinate keeps the workflow working even when Google shifts the layout or the question order changes.
For a text or paragraph question, type the answer. For multiple choice, click the option you want. For a dropdown, open it and choose the value. The next section covers every field type in detail.
Step 4 — Submit the form
Add one more Smart HTML action pointing at the Submit button and click it. If the form has multiple pages, repeat the 'wait → fill → Next' block for each page before you reach the final Submit button. Google labels the final button "Submit" and the earlier ones "Next", so target them by their text or captured selector rather than by position.
Step 5 — Confirm the submission worked
Use IF element to check for the "Your response has been recorded" confirmation screen. If it is there, mark the run as a success; if not, log it for later. This step turns the workflow from 'runs and hopes' into a process you can actually trust, because you end up with a per-run record of what happened instead of an assumption that every submit landed.
Handle every Google Form field type
Google Forms uses a handful of question types, and each one needs a slightly different action. Getting this mapping right is what separates a workflow that fills three fields from one that submits a real, complete response.
| Google Form question type | RunMacro action | Value source |
|---|---|---|
| Short answer / Paragraph | Smart HTML → Type text | Fixed text or a variable such as name |
| Multiple choice (radio) | Smart HTML → Click one option | Captured option selector |
| Checkboxes | Smart HTML → Click each required option | One or more option selectors |
| Dropdown | Click dropdown → Wait → Click option | Item text or captured selector |
| Linear scale / Grid | Click the rating cell or row-column intersection | Rating variable or fixed choice |
| Date / Time | Type into the date or time sub-fields | Date or time variable |
When a value comes from your spreadsheet rather than a fixed answer, insert the variable in place of the literal text. That is how one fill step handles a different name, email, or rating on every run.
Feed dynamic data into each submission
Filling one fixed form is easy; the real value is submitting a different set of data each time. Let the workflow read from a spreadsheet. Use Data Source – Get Row to read each row from a CSV, Excel file, or Google Sheet. Get Row creates reusable variables from the source headers automatically.
Then wrap the whole 'open form → fill → submit' block in a Loop. Each pass grabs a new row, fills the matching variables into the form with Use Variable, and submits, until the data runs out. To make the loop safe to stop and restart, use Mark Row to flag each row the moment its submission is confirmed, so a re-run skips everything already sent.
A useful habit: keep the "which row am I on" state in the data file itself rather than in a counter held in memory. If the workflow stops halfway — you close the laptop, Windows restarts for an update — the marked rows tell it exactly where to resume.
Real-world example: 200 survey responses overnight
Say you have an authorized 200-row survey dataset with columns such as row_id, full_name, department, rating, and status. The outline below is illustrative — each line maps to a visual RunMacro command, not importable workflow code.
[ILLUSTRATIVE WORKFLOW: GOOGLE FORM BATCH SUBMITTER]
1. LOOP 200 TIMES
2. DATA SOURCE - GET ROW        status = "unused"
3. OPEN URL                     "Your authorized Google Form"
4. SMART HTML WAIT              "Form ready" selector profile
5. SMART HTML TYPE              "Full name" = {full_name}
6. SMART HTML TYPE              "Department" = {department}
7. SMART HTML CLICK             "Rating" = {rating}
8. SMART HTML CLICK             "Submit"
9. SMART HTML IF                "Confirmation" is present
     APPEND CUSTOM CSV ROW      row_id={row_id}, result="SUCCESS"
     DATA SOURCE - MARK ROW     status="success"
   END IF
10. RANDOM DELAY                2-5 seconds
Run it after testing two or three rows first. If the form, network, validation, and machine remain available, the batch can finish unattended with a durable per-row result file. The display may be turned off, but Windows must stay awake. Use the Scheduler to start it at a set time, and place a Telegram notification after the loop to report normal completion.
Run it on a schedule or across profiles
Two features turn a working form-fill into something that runs itself. The Scheduler starts a workflow at a chosen time or interval, so a nightly batch needs nobody at the desk. Separate Chrome CDP profiles let you run the same workflow under different signed-in accounts, which matters when a form is limited to one response per account. To push throughput further, see how to run multiple Chrome profiles in parallel.
Common mistakes and how to fix them
| Common Mistake | How to Fix |
|---|---|
| Filling before the page is ready | Place Wait for element before the first field and after every page transition. |
| Leaving a required question blank | Validate required source columns first; branch with If Variable to log and skip incomplete rows. |
| Targeting the radio button's outer wrapper | Re-capture the intended option with the Smart HTML element picker and test it on two or three rows before the batch. |
| Submitting the same data twice | Mark Row only after the confirmation is present, then fetch rows whose configured status is still unused. |
| Submitting too quickly | Add Random Delay so the page settles and requests remain within reasonable service limits. If CAPTCHA or verification appears, stop and handle it manually — do not try to defeat it. |
Keep it compliant and reliable
Automation is a productivity tool, not a way around a form owner's rules. Fill forms you are authorized to submit — your own surveys, your team's intake, or test data on a form you control. Do not spam a public form, stuff a poll, or submit on someone else's behalf without permission.
• ✅ Add Random Delay between submissions for page settling and respectful request pacing
• ✅ Confirm the success state with Wait for element or IF element before marking a row complete
• ✅ Write a durable result with Append Custom CSV Row so failed rows are easy to trace
• ✅ Test with two or three rows before running the full file
• ✅ Stop and request manual handling if CAPTCHA or verification appears; do not try to bypass it
Troubleshooting
| Problem | Solution |
|---|---|
| Form never finishes loading | Point Wait for element at a selector profile that appears only when the form is interactive, and allow enough time for slow networks or embedded media. |
| Workflow types into the wrong field | Re-capture the field with the element picker. Prefer a selector profile tied to the intended question or stable field identity rather than its position. |
| Submit click does nothing | Confirm it is the final Submit rather than an intermediate Next, and check whether an unanswered required field is blocking submission. |
| Confirmation check always fails | Match IF element to the exact confirmation shown by that form and locale, or verify the expected confirmation-page state. |
| Background Chrome does not start | Confirm Chrome is installed and no conflicting instance holds the selected profile. Follow the Background mode setup checklist. |
Frequently asked questions
How do I auto-fill a Google Form without code?
Assemble visual commands — Open URL, Wait for element, Smart HTML, and IF element — like building blocks. No scripting is required. Record-and-replay with Smart Record is an even faster start for a form you fill the same way each time.
Can it submit different data on every run?
Yes. Point a Data Source at a CSV, Excel file, or Google Sheet, pull each row into variables with Get Row, and loop the fill-and-submit block. Each pass reads a new row, so every submission carries its own name, email, or rating.
Will filling forms break if I use the computer for something else?
No. Because it runs in background Chrome over CDP, the workflow does not depend on the real cursor position, so you can keep working in parallel without disrupting the fill.
Can it handle multi-page forms or conditional questions?
Yes. Repeat the 'wait → fill → Next' block for each page, and use IF element to branch based on which question is shown.
Can it run overnight or on a schedule?
Yes. Hand the workflow to the Scheduler to start it at a set time, and add a Telegram notification if you want to know when it finishes. The machine stays usable while it runs.
Will Google block automated submissions?
A workflow that fills one response at a reasonable pace behaves like a person filling the form. Firing hundreds of submissions a minute, or defeating a CAPTCHA, can trip abuse controls and breaks the form's terms. Keep the pace human and only automate forms you are allowed to submit.
Does this work for other forms, not just Google Forms?
The same open → wait → fill → submit pattern works on most web forms, because Smart HTML targets page elements rather than anything specific to Google. Field names and confirmation screens differ, so you re-capture selectors for each new form.
Is RunMacro free?
RunMacro offers a free trial. Current plan limits and pricing are listed on the pricing page.
Conclusion
Automating authorized Google Form submissions can reduce repetitive entry time — when it runs in background Chrome, it also gives back the thing you value most: a computer that stays usable while the automation works. Start with one simple form, test a few rows, then scale up. Once you are comfortable, see how to run multiple Chrome profiles in parallel to multiply your throughput, or run automation while gaming on the same computer. For high-speed form submission at scale, explore our specialized form autofill solution alongside Chrome Extension and comprehensive web automation. When you are ready, download RunMacro for Windows.