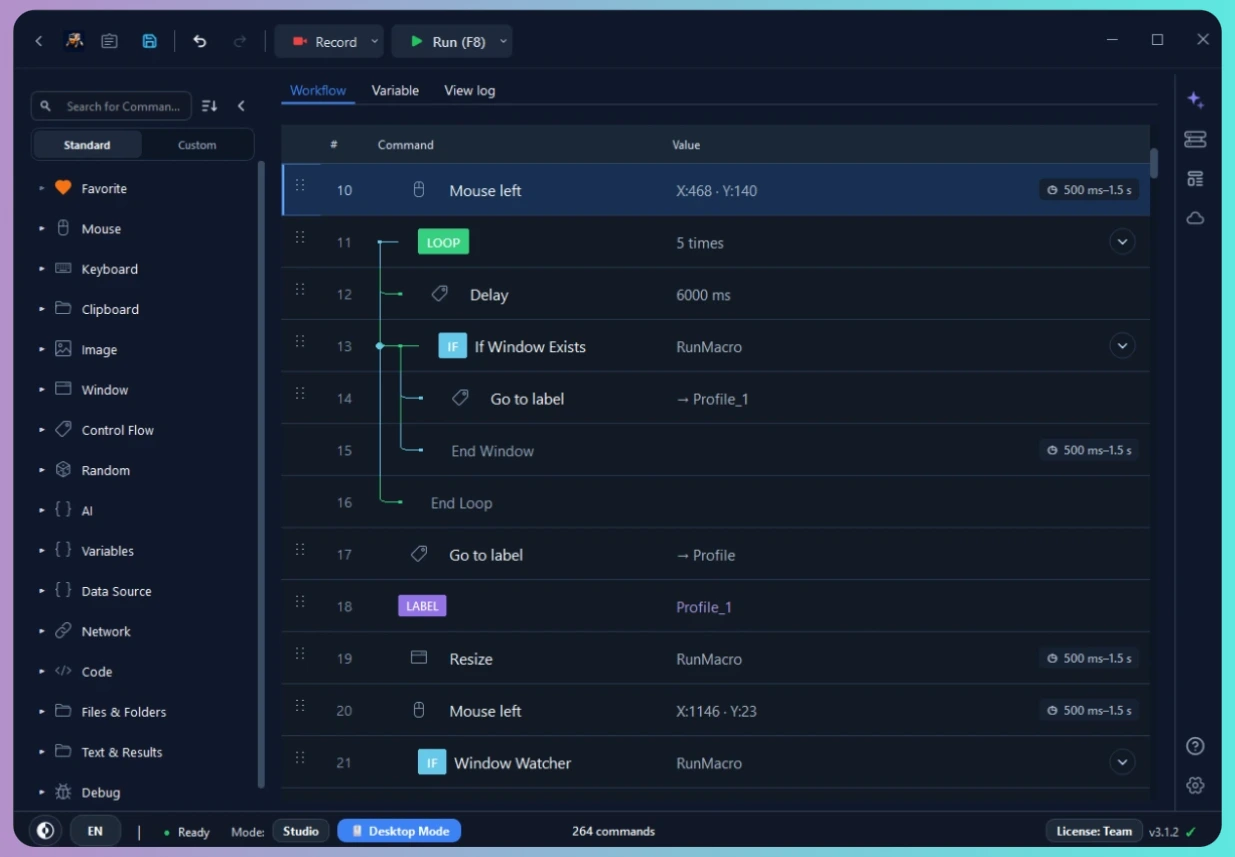
An auto clicker for Windows repeats a mouse action at a position and interval you choose. In RunMacro, the smallest useful setup combines a Mouse Click command with a repeat control. Mouse Click can capture screen coordinates with F2, press the left, right, or middle button, double-click, and wait for a fixed or variable interval after each action.
That setup works well when the target stays in one place. A moving web button needs a different method: Browser Mode can click inside Chrome without taking over the physical mouse, while Smart HTML can target the page element instead of a coordinate.
F9, customizable to ESC, F12, or another key in Settings). You always keep full control over your computer.F2, configure Mouse Click, set its delay-after-run range, and repeat it with the Studio outer Loop or a Loop block. Start with five clicks and keep the default F9 stop hotkey ready.Choose the right kind of auto clicker
Coordinate clicking is useful when all of these conditions are true:
• The button or control has a stable position.
• The window size, display scaling, and screen resolution will stay the same.
• Repeating the click cannot submit, delete, purchase, or otherwise change something you have not reviewed.
• The target application accepts simulated mouse input.
Common examples include stepping through a fixed desktop test screen, pressing the same control in an internal tool, or checking whether a button responds consistently across a bounded number of attempts.
Use another method when the target moves. For a desktop control that can appear at different coordinates, Find Image can locate a known visual target first. For a Chrome page, Smart HTML element actions can target the element itself and usually survive ordinary layout changes better than a saved X/Y point.
Do not run unattended clicking against a site, game, or service that prohibits automation. Random timing and position options are testing and tolerance tools. They do not change the target's terms, rate limits, or abuse controls.
| Criterion | Coordinate Click (Desktop / Point) | Smart HTML (Selector / Web) |
|---|---|---|
| Operating scope | Any Windows app, game, canvas, desktop tool | Web pages inside Chrome only |
| Takes over mouse? | ⚠️ Yes (drives physical mouse pointer) | 🟢 No (runs in background via CDP) |
| Display & layout sensitivity | Fragile if resolution, DPI scaling, or window moves | 🟢 Sturdy; immune to layout & responsive shifts |
| Target capture method | Press F2 to pick screen coordinates | Click element to capture HTML selector |
Prepare a safe first test
A short controlled test catches most coordinate and timing mistakes before they matter.
1. Open Windows Calculator and leave it visible.
2. Keep its size and position fixed while you configure the workflow.
3. Confirm that F8 pauses or resumes and F9 stops by default. You can change both in RunMacro Settings if another program uses them.
4. Plan a bounded run of five clicks. Do not start with an endless loop.
5. Close or move any window that could cover the Calculator button during the test.
Calculator is a useful target because repeated clicks on the 1 button produce an obvious, harmless result. Use a similarly disposable screen when you test your own workflow. Avoid a real form, file operation, payment screen, or production admin panel.
Set up an auto clicker step by step
Step 1: choose Desktop Mode or Browser Mode
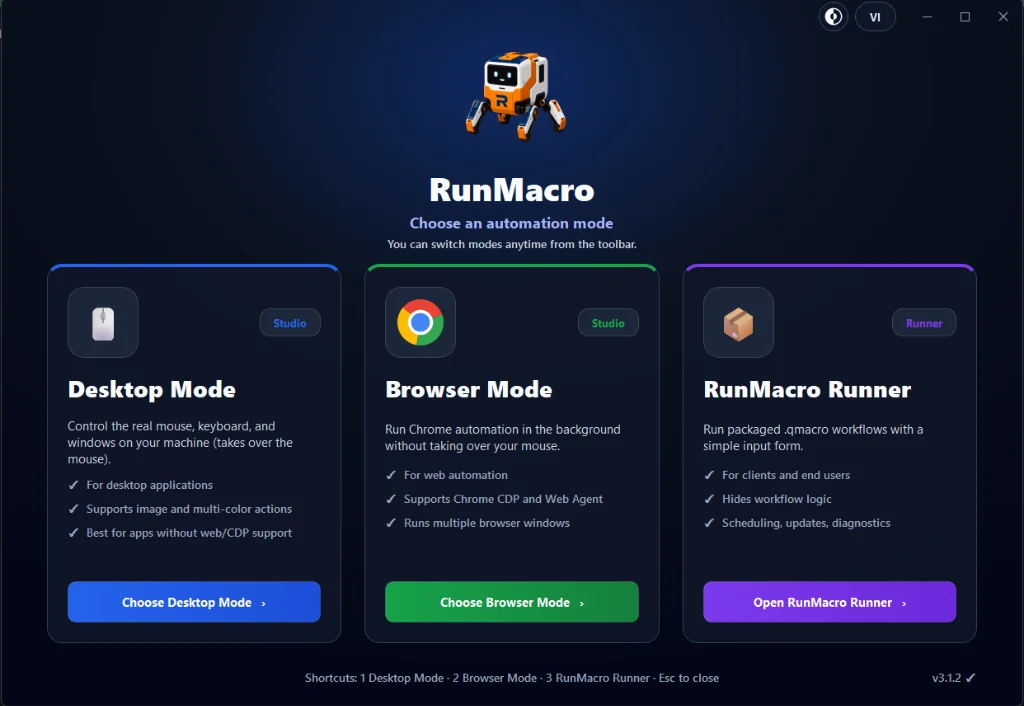
Use Desktop Mode for native Windows software. It controls the system pointer, so the workflow can move your real cursor and you should leave the mouse alone while it runs.
Use Browser Mode for Chrome automation that should run without taking over the physical cursor. A coordinate-based Mouse Click is sent into the page through Chrome DevTools Protocol (CDP). If the page element can move, use Smart HTML rather than a viewport coordinate.
Step 2: add a startup delay
Add a short Delay before the repeated section, such as 1500 ms. This gives you time to bring the Calculator or target application to the foreground after starting the workflow.
Keep this startup delay outside the inner Loop block. Otherwise, the full startup pause will repeat before every click.
Step 3: add Mouse Click and capture the target
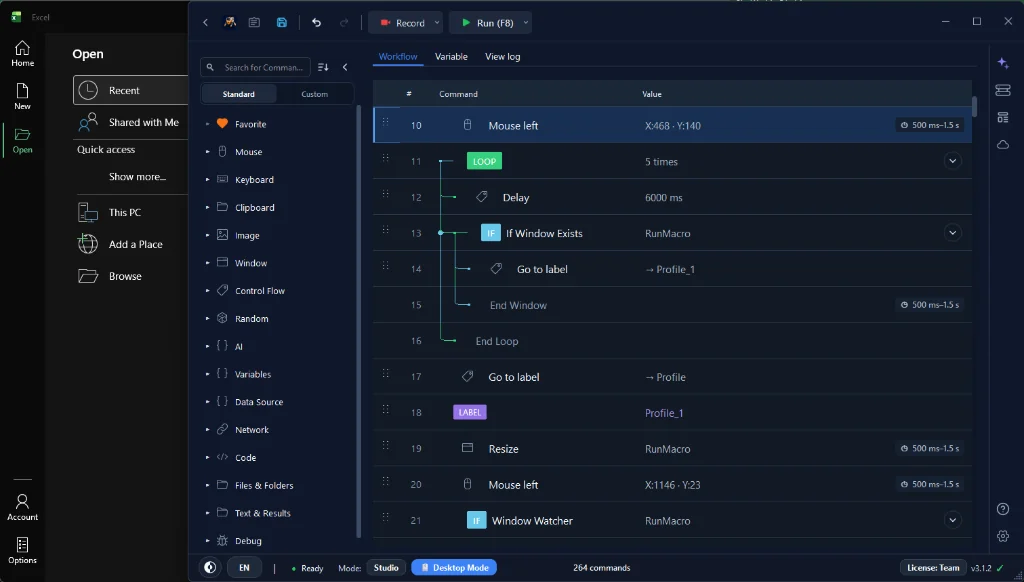
Add Mouse > Mouse Click. Open its settings and choose Pick target, or press F2. The screen dims while you move the pointer to the target. Click the center of the Calculator 1 button. RunMacro fills the X and Y coordinates for you.
Coordinates are measured from the top-left of the screen. Capturing them with F2 is safer than typing them by hand, but the saved point still depends on the same display layout being present during the run.
Step 4: choose the click action
RunMacro supports five primary mouse click actions to handle different desktop and browser interactions:
| Click Action | Common Use Case | RunMacro Command |
|---|---|---|
| 🖱️ Single Click (Left) | Press buttons, select checkboxes, open links | Mouse Click (Left) |
| ⚡ Double Click | Open files on desktop, select a word | Mouse Click (Double) |
| 📋 Right Click | Open context menu, copy/paste shortcuts | Mouse Click (Right) |
| 🔄 Hold and Drag | Drag sliders, reorder items in games or canvas | Mouse Button Down → Mouse Move → Up |
| 🎯 Middle Click | Open links in background tab in browser | Mouse Click (Middle) |
Leave Double Click off for the Calculator test. If a previous command has already positioned the pointer, Use current mouse position tells Mouse Click to ignore the saved X/Y coordinates and click where the cursor is.
Step 5: set the interval between clicks
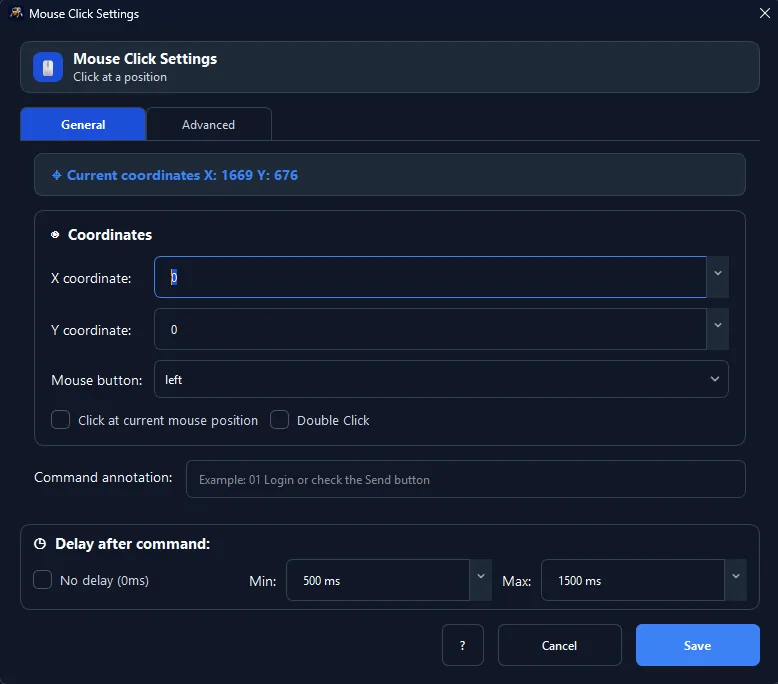
Mouse Click includes Delay after run, expressed as minimum and maximum milliseconds. The command waits for one value in that range after clicking, then the workflow continues.
For a fixed half-second interval, set both values to 500. For a variable interval, set a range such as 500 to 900. A separate Random Delay command can also add a variable pause, but avoid stacking delays unless you intend to add their times together.
The micro-delay option serves a different purpose. It adds a small variable pause immediately before the press. It is part of the click action, not a readiness check for the target application.
Step 6: configure positional tolerance carefully
RunMacro offers three related controls, and they do different jobs:
• Random X/Y offsets the saved coordinate by up to the number of pixels you set.
• Click jitter adds a small pointer wobble before pressing.
• Random Click Position chooses one point from a list of up to 50 coordinates that you saved yourself, then moves, left-clicks, or right-clicks there.
Enable an offset only when every possible point remains inside the valid target. A ±5 pixel offset may be safe in the center of a large button and unsafe beside a checkbox, menu edge, or narrow link. Set the offset to 0 and disable jitter when the click must land on an exact pixel.
Random Click Position does not discover the bounds of a button and does not choose any arbitrary pixel inside it. Use it when you have several known valid points or several separate targets that your test is meant to sample.
Step 7: repeat the click
RunMacro gives you two practical ways to repeat the action:
• Use the Studio outer Loop when the entire workflow should repeat.
• Use Flow > Loop when only part of the workflow should repeat. Set the count, place Mouse Click inside the block, and close it with End If.
For the Calculator test, arrange the commands like this:
1. Delay: 1500 ms
2. Loop: 5 iterations
3. Mouse Click: Calculator 1, Delay after run 500 to 500 ms
4. End If
This structure gives you one startup pause followed by five clicks. After the fifth iteration, the workflow leaves the Loop block and stops.
Step 8: run and verify
Start the workflow, bring Calculator to the foreground during the startup delay, and leave the mouse alone. The display should show 11111 after five clicks.
Press F8 if you need to pause and inspect the state. Press F9 to request a stop if the pointer moves toward the wrong target or the application changes unexpectedly. Wait until RunMacro reports that execution has stopped before taking control of the mouse again.
How click speed works
The interval you configure is a requested delay, not a hardware-timed click rate. Windows scheduling, the target application's response time, micro-delay, and any other commands in the Loop add overhead.
For a simple Mouse Click loop with no extra waits, these values give a rough starting point:
• 1000 ms is about one click per second.
• 500 ms is about two clicks per second.
• 250 ms is about four clicks per second.
The actual rate can be lower. If you add a 300 ms Delay command and a 500 ms delay after Mouse Click, each cycle already includes at least 800 ms before execution overhead.
Faster is not automatically more reliable. An application can miss clicks, queue work, or expose the next control late. Increase the interval when the target cannot keep up. If the workflow must wait for a specific screen state, check that state with Find Image or Smart HTML instead of assuming that a longer or random delay proves readiness.
Make coordinate clicks reliable
Most failed auto-clicker runs stem from environmental shifts on your Windows desktop rather than the click command itself. Follow this practical checklist:
✅ DO:
• Lock the target application window to a fixed position and size before launching
• Capture coordinates at the exact center of the button or clickable region
• Keep your Windows display scaling (DPI scaling) constant at 100% between capture and execution
• Pair clicks with Find Image or Smart HTML when elements can drift across sessions
• Insert a Wait for element or a brief Delay so the target UI finishes rendering before clicking
❌ DON'T:
• Do not move, maximize, or resize the target window while automation is running
• Do not let other applications, notifications, or popups cover the target click area
• Do not change monitor resolution or switch multi-monitor setups between capture and replay
• Do not use fixed coordinate clicks on dynamic, responsive web pages—switch to Smart HTML instead
• Do not attempt to automate games that strictly forbid bots or bypass anti-cheat protections
Keep the screen geometry stable
A saved coordinate does not follow a button. Moving the window, switching monitors, changing resolution, or changing Windows display scaling can place the same X/Y point somewhere else. Capture the point again after any of those changes.
Place the target window in a repeatable position before each run. If another window or notification covers the coordinate, the click can hit the covering window instead.
Aim inside the safe area
Capture the center of the clickable region rather than its border. Leave Random X/Y and jitter off until a small fixed test succeeds. If you enable either option, check the full offset area, not only the original point.
Wait for evidence, not just time
A fixed or random delay only waits. It cannot tell whether a page finished loading, a dialog opened, or a save completed. Use a condition when the next click depends on visible state. Find Image is appropriate for a recognizable desktop target; Smart HTML is more reliable for a web element with a stable selector.
Match the target's input method
Some games and protected applications use raw input or other handling that may ignore simulated clicks. RunMacro cannot guarantee that every application will accept them. Do not try to bypass anti-cheat, access controls, or protected input paths.
Desktop and browser clicking are different
Desktop Mode controls the Windows system pointer. The target should be visible and ready, and you generally cannot use the same mouse for other work during the run.
Browser Mode sends a coordinate click into Chrome through CDP, so it does not take over the real cursor. The coordinate is tied to the page viewport, and Browser Mode ignores Mouse Click's Random X/Y and jitter options. Coordinate clicks can still miss when responsive layout, banners, zoom, or content loading moves the element.
Smart HTML avoids that coordinate dependency by acting on the web element. Use it for buttons, links, and inputs that have stable page identity. Keep coordinate clicking for canvas content, remote desktops, or other surfaces where a normal HTML element is not available.
For an in-depth comparison of when to use each approach, read our guide on desktop vs browser automation. If you want to automate web tasks while playing or doing other work without cursor interference, see how to run automation while gaming.
Single click, double-click, hold, and drag
Choose the mouse command that matches the physical action:
• Mouse Click handles single, right, middle, and double clicks.
• Hold Click holds a selected button at one position for a duration in milliseconds, then releases it. Hold Click is a Desktop Mode command.
• Drag-and-drop needs separate Mouse Button Down and Up actions with Mouse Move between them. Hold Click alone does not describe a path across the screen.
Test press-and-hold and drag workflows with the same small-count rule. A stuck or misplaced button-down event is harder to recover from than a single bad click.
Troubleshooting
| Problem | Solution |
|---|---|
| 📍 Click lands in wrong position | Recapture target coordinates with F2 in Mouse Click; verify window position, screen resolution, and set display scaling to 100%. Disable Random X/Y while testing. |
| 🛑 Nothing happens on click | Bring target app to foreground; run RunMacro as Administrator if target app runs with elevated rights. Note: Windows UAC and Secure Desktop cannot receive simulated clicks. |
| 🎮 Game or protected window ignores clicks | Games using raw input or anti-cheat reject simulated OS events. Check game rules; native desktop clicks cannot bypass anti-cheat protection. |
| ⌨️ Stop hotkey does not respond | Press global F9 stop hotkey rather than chasing the UI Stop button with the cursor; assign a new shortcut in Settings if another program intercepts F9. |
| 🎯 Coordinates drift during capture | Set Windows display scaling to 100%; keep windows stationary while pressing F2; switch to Smart HTML for web pages or Find Image for dynamic desktop controls. |
| ⏩ Some clicks are skipped | Increase Delay after run in Mouse Click or insert a Delay; wait for target UI to render instead of rushing clicks. |
| 🖥️ First click goes to Studio | Insert a startup Delay before the loop to bring the target window to the foreground so Studio does not overlap it. |
| 🌐 Browser clicks ignore Random X/Y | In Browser Mode, CDP clicks dispatch directly to viewport coordinates; switch to Smart HTML for element-level targeting. |
Frequently asked questions
Can RunMacro auto click without code?
Yes. Add Mouse Click, capture a point with F2, set the delay, and repeat the command with the Studio outer Loop or a Loop block. You do not need to write a script.
Can it click a specific number of times?
Yes. Use a fixed Loop count for a selected block, or set the Studio outer Loop when the whole workflow should repeat. Start with a small bounded count before running a longer job.
Can it click without taking over my mouse?
Yes, for Chrome. Browser Mode sends clicks into the page through CDP without moving the system pointer. For native Windows applications, Desktop Mode controls the real cursor.
Can it right-click, double-click, or hold the mouse button?
Mouse Click supports right-click and double-click. Hold Click keeps a selected button pressed for a configured duration and then releases it. Drag-and-drop requires Mouse Button Down, Mouse Move, and Mouse Button Up.
Can I use it in a game?
RunMacro can send desktop mouse input, but a game may ignore simulated input or prohibit automation. Check the game's rules first. RunMacro is not a tool for bypassing anti-cheat or protected input handling.
Is RunMacro's auto clicker free?
RunMacro offers a free trial. Current plan limits and pricing are listed on the pricing page.
Why does the click miss after I move the window?
The saved X/Y point stays fixed on the screen. It does not follow the control. Move the window back to its original position or capture the target again. For moving web elements, use Smart HTML instead.
Build the smallest reliable workflow first
A dependable auto clicker starts with one known target, one Mouse Click, a visible interval, and a five-iteration test. Once that works, add conditions, positional tolerance, or more workflow steps one at a time.
Read the Mouse Click command guide for every option, compare desktop vs browser automation, or see how to build your first workflow before combining clicks with keyboard, image, and browser actions. If you're multitasking while playing, check out running automation while gaming. Need to simulate keyboard keystrokes alongside clicks? Explore our auto keyboard guide. To record full multi-step desktop workflows, check our Windows macro recorder. When you are ready to test it, download RunMacro for Windows.