RunMacro Documentation
Create your first robot, then go further as needed.
Clear step-by-step guides to create, run, and improve robots for repetitive computer work.
Automate mouse clicks in RunMacro
Mouse Click presses the left, right, or middle mouse button at given coordinates — it runs in both Desktop Mode (system pointer) and Browser Mode (dispatched into the page through Chrome CDP). It works best for stable layouts; use Find Image or Smart HTML when the target moves.
Prerequisites#
- The target application is open on the screen to automate.
- Coordinates were captured with F2 or verified manually.
- Resolution, display scaling, and window position match the setup used to capture the point.
Supported modes#
- Desktop Mode — Controls the system pointer and can take over the cursor while running.
- Browser Mode — Runs in the background through Chrome CDP: the click is sent into the page using viewport coordinates without taking over the real mouse. Jitter and Random X/Y are skipped in this mode.
What it does#
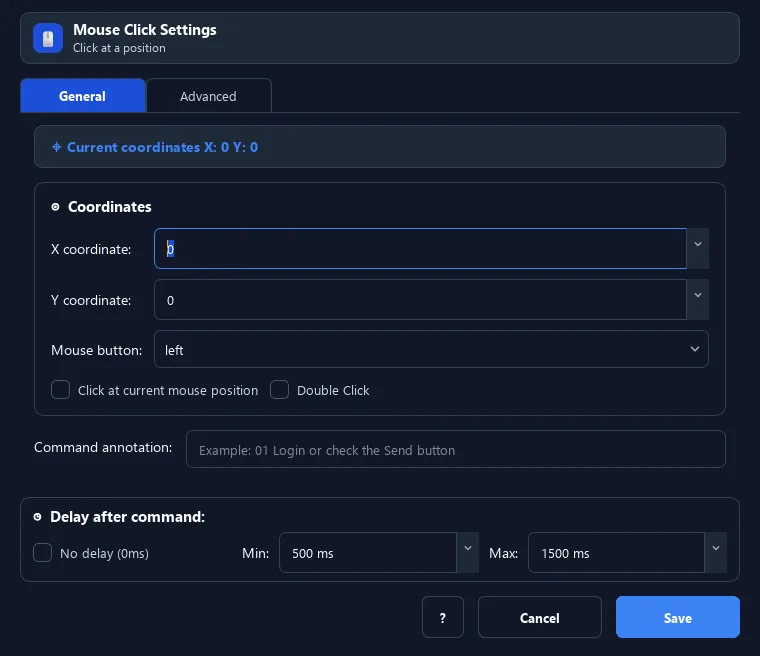
The Mouse Click command makes RunMacro automatically click the mouse (left, right, or middle) at a screen position you choose — it clicks for you, hands-free. There is also a Move option that only moves the pointer there without pressing. This is the most basic and most-used command in automation.
Screenshots & video#
When to use it#
- Click a button, input box, or icon in an app or website.
- Open a menu, choose an item, or confirm a dialog.
- Turn on Double Click to open a file/folder.
- Use the right button to open a right-click context menu.
When not to use it#
- The web element frequently moves or the window may be repositioned.
- You need to keep using the mouse while the workflow runs.
- The target is too small for Random X/Y or Jitter to remain inside it.
Configuration steps#
- In RunMacro, click add-command and choose Mouse › Mouse Click.
- Click Pick target (or press
F2) — the screen dims. - Move the cursor to the exact spot to click, then press the mouse — the
X, Ycoordinates fill in automatically. - Choose the mouse button: Left / Right / Middle / Move (Left by default).
- Optionally enable Double Click or adjust the natural-timing options (below).
- Click Save. The Mouse Click command is now ready in your script.
Every option explained#
Expected result#
RunMacro presses the configured mouse button at the selected coordinates, then waits for the configured delay before continuing.
Real example#
Example: auto-click a "Sign in" button#
- Add a Mouse Click command.
- Press
F2, aim at the "Sign in" button, then click to capture the coordinates. - Keep the Left button, leave Double Click off.
- Set Delay after run = 800ms to wait for the page.
- Save and test — RunMacro will click the Sign in button for you.
Limitations and failure cases#
- Fixed coordinates do not adapt to layout, DPI, or window-position changes.
- The click may hit the wrong place if the target app is not foregrounded or ready.
- Random X/Y and Jitter are unsuitable for targets with a narrow clickable area.
Tips & common mistakes#
Verification details#
commands/mouse.py