
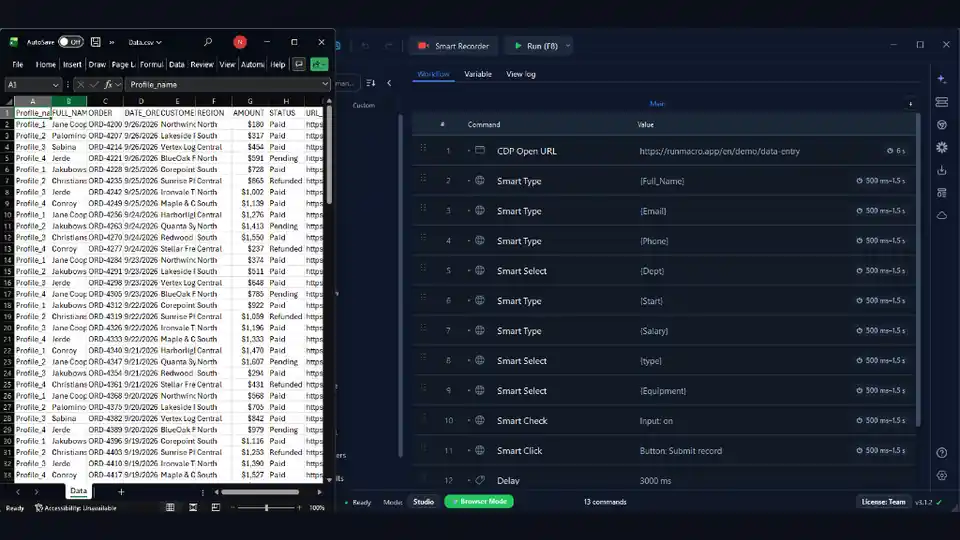

IIf part of your day is copying rows out of Excel and re-typing them into a website or app, you already know the drill: it is slow, mind-numbing, and one mistyped cell can cause hours of cleanup. Excel automation with RunMacro turns that chore into a workflow you build once and reuse — it reads each row from your spreadsheet and enters the supplied values consistently when the source data, target interface, and validation remain stable.
In this guide you will build a workflow that reads data from an Excel or CSV file row by row, types it into a target form or app, and logs the result so you know exactly what was processed. Because RunMacro can drive background Chrome over CDP for web targets, the whole thing can run without taking over your mouse.
Why automate data entry from Excel?
Manual data entry has three built-in problems. It is slow — every row costs seconds that add up to hours across a big file. It is error-prone — fatigue leads to transposed digits and skipped fields. And it is not repeatable — next week's batch means starting over. A workflow removes all three: it works at a steady pace, enters values identically every time, and can be re-run whenever new data arrives.
There is a fourth win that is easy to miss. Once the entry lives in a workflow, the *rules* live there too. The date format you always forget, the field you must leave blank when another is filled, the account code that depends on the region — encode each once and the workflow can apply it consistently across the batch.
When automation pays off — and when it does not
Automate when the task is repetitive, rule-based, and high-volume: the same fields, filled the same way, many times. A weekly import of a few hundred orders, a nightly sync of new leads, a one-time migration of a legacy list — these are exactly where a workflow earns back its setup time within the first run or two.
Skip automation when every entry needs human judgment, when the target screen changes constantly, or when you will run it only a handful of times on a dozen rows. There you would spend more time building and maintaining the workflow than simply doing the work by hand. A good rule of thumb: if you can describe the entry as a fixed set of steps without saying "it depends", it is a strong automation candidate.
What you will need
• RunMacro installed on Windows.
• An Excel (.xlsx) or CSV file with your data in clean, headed columns — a Google Sheet works too.
• The target where the data goes: a website form (run in background Chrome) or a desktop application.
If you have never built a workflow before, start with the workflow builder guide to get comfortable with the interface first.
Step 1 — Prepare your spreadsheet
The single biggest cause of a failed data-entry run is messy source data, not the automation. A few minutes tidying the sheet saves far more time later.
• One record per row, one field per column. Give every column a clear header — name, email, amount, sku. The workflow reads by column, so stable headers matter more than their order.
• Trim and normalize. Strip stray leading and trailing spaces, make sure required columns are never empty, and settle on one format per column (one date format, one currency style). You can also clean values inside the workflow, but clean input is simpler to reason about.
• Keep the structure stable. You can swap in a new file any time, as long as the columns match. Renaming or reordering columns is what breaks a saved workflow, not adding new rows.
• Watch numbers and leading zeros. A ZIP code or account number that starts with 0 can lose it when Excel treats the cell as a number. Store those columns as text so the value arrives intact.
Step 2 — Read a row into variables
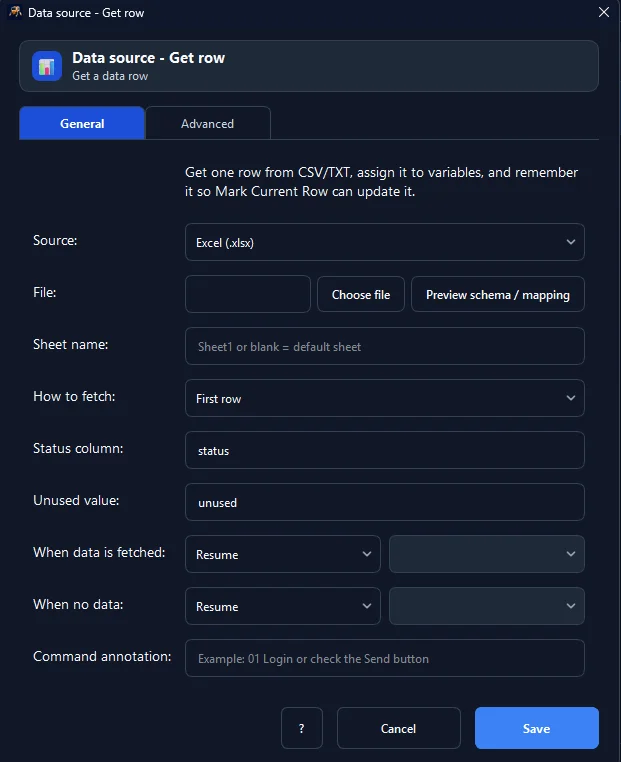
Use Data Source – Get Row to pull the next record from a CSV, Excel file, TXT file, or Google Sheet. Get Row automatically creates variables from the source headers, which you can reference in later steps with Use Variable.
Naming matters here. Call the variables after the columns — customerEmail, not var2 — so a step you write three months from now still reads clearly and a wrong-column bug is obvious at a glance.
For example, after Get Row you might have:
customerEmail  →  {customerEmail}
orderAmount    →  {orderAmount}
shippingZip    →  {shippingZip}
These variable names are what you drop into every downstream step with Use Variable.
Step 3 — Enter the data into a website or desktop app
The fill step is where web and desktop targets diverge. RunMacro handles both, and many real workflows mix them.
| Criterion | Website target | Desktop app target |
|---|---|---|
| Commands | Smart HTML + Wait for element | Type Text, Paste Text, Key Press (Tab) |
| Execution | Background Chrome (CDP) | Foreground active window |
| Takes over mouse or keyboard? | No — keep using the computer | Yes — keep the target window focused |
| Layout resilience | DOM selectors tolerate ordinary layout shifts | Keep focus and window position stable; prefer Tab navigation |
Into a website
Use Smart HTML element actions to fill each field by selector. Rather than writing CSS by hand, use the element picker to click a field and let RunMacro capture a selector for you. Selector targeting keeps working when the layout shifts, unlike a saved coordinate. Put a Wait for element before the first field and after each navigation so the page is ready before you type. Because this runs in background Chrome over CDP, the entry proceeds without moving your real cursor.
Into a desktop app
Use Type Text to send a value into the focused field, and Key Press with Tab to move to the next field the way you would by hand. For long values, Paste Text is faster and more reliable than typing character by character. Desktop entry uses the real keyboard, so the target window must stay focused — plan to run those steps while you are away from the machine.
Step 4 — Clean and transform values before entry
Source data is rarely in exactly the shape the target wants. Fix it in the workflow instead of pre-editing every file.
• Reformat with Calculate when a field is derived — a total from quantity and price, or a value scaled to different units.
• Extract the part you need with Extract with Regex — pull a phone number out of a longer string, or split a full name into first and last.
• Strip stray formatting with Clean Text so hidden characters or inconsistent spacing do not reach the target field.
A short transform block right after Get Row keeps the fill steps simple:
{rawPhone}       →  Extract with Regex  →  {cleanPhone}
{fullName}       →  Extract with Regex  →  {firstName} + {lastName}
{quantity} * {unitPrice}  →  Calculate  →  {lineTotal}
Each field is already the exact string the target expects.
Step 5 — Loop through every row
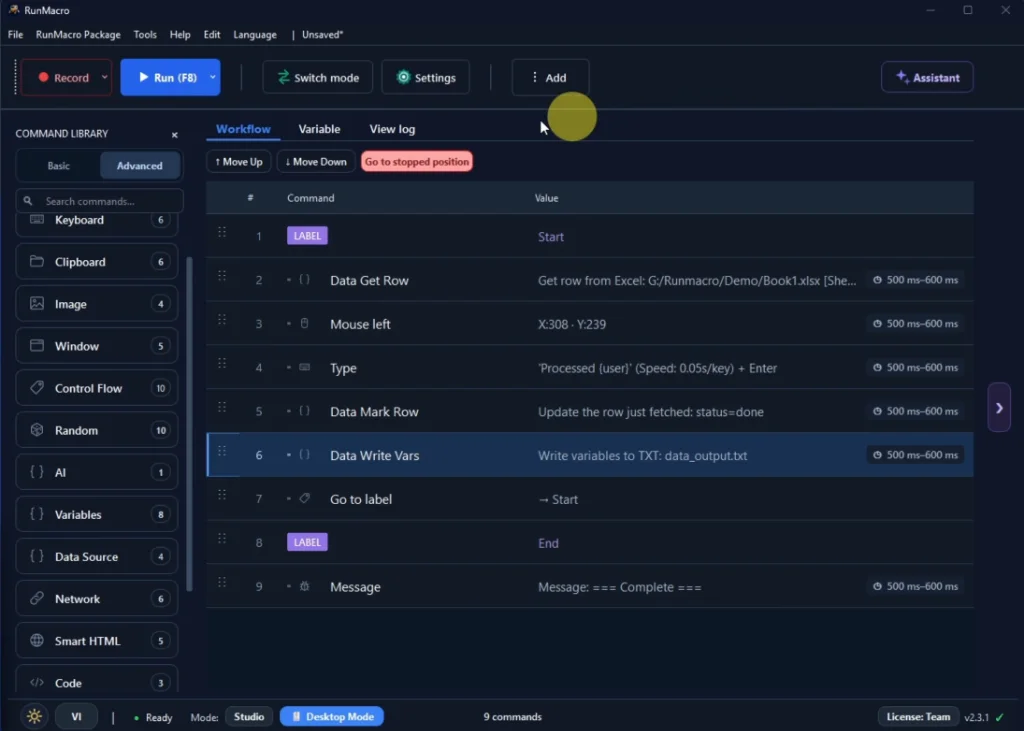
Wrap 'get row → transform → enter → submit' in a Loop so the workflow advances to the next record and repeats until the file is done. Each pass reads fresh values into the same variables, so the steps you wrote once apply to every row.
Make the loop safe to stop and restart. Use Mark Row to flag each record the moment its entry is confirmed, and have Get Row fetch the next *unmarked* row. If the run stops halfway — a reboot, a closed lid, a target that went down — restarting picks up exactly where it left off instead of re-entering everything from the top.
Step 6 — Log results and verify
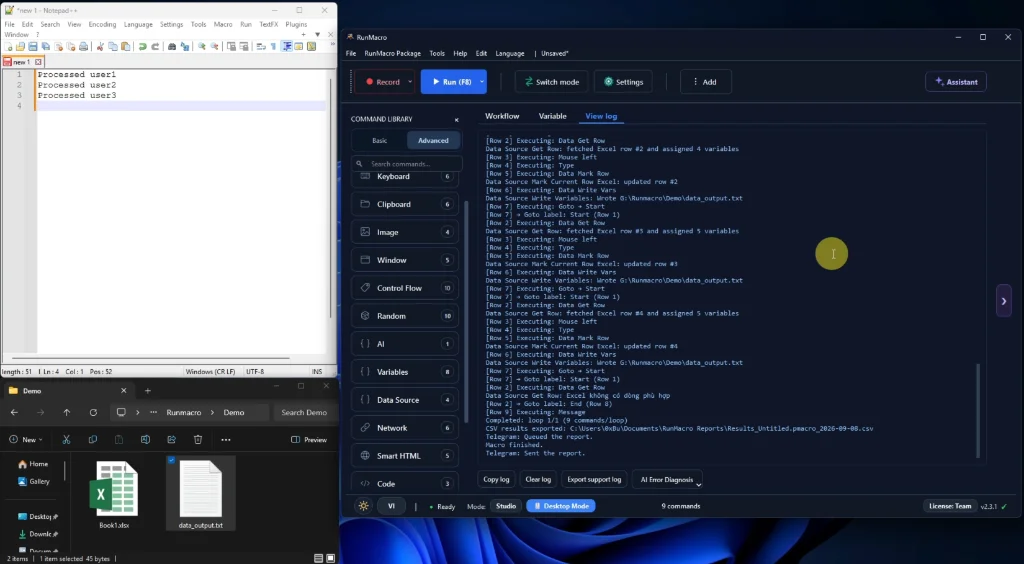
Trust comes from evidence, not hope. After each record, append a durable result with Append CSV Row or Append Text File: the row number, a timestamp, and success or failure. Confirm success before you log it — check for the target's confirmation with IF element rather than assuming every submit landed. The payoff is a result file you can filter to re-run only the rows that failed.
Then test with two or three rows before you run the whole file. A three-row dry run catches a wrong selector, a date-format mismatch, or an off-by-one column in seconds, long before it repeats three thousand times.
Real-world example: 300 products into a web catalog
Say you have 300 product rows to enter into an internal web catalog. The workflow opens the catalog page in background Chrome, gets the first unmarked row, fills SKU, name, and price with Smart HTML, submits, checks for the success message, appends 'OK' with the row number to the log, marks the row done, then loops to the next — all the way to 300.
After testing a small sample, the workflow can process the remaining rows unattended while the source, target, network, and machine remain available. To run it without being at the desk at all, hand the workflow to the Scheduler so it starts at a set time, and add a Telegram notification as the last step so you hear the moment it finishes.
Handle the errors that break data-entry runs
| Problem | Solution |
|---|---|
| Page loads slowly / network lag | Add Wait for element before the first field and after each navigation — never rely on a fixed delay alone. |
| Empty or malformed cells in Excel | Branch with If Variable to skip the bad row and log it instead of crashing the run. |
| Click lands on the wrong field | Prefer stable selectors over coordinates; re-capture with the element picker if the target app updates its layout. |
| Duplicate entries on re-run | Mark Row as processed after success so a restart skips completed records. |
| One bad row stops the entire batch | Wrap risky steps so a failure logs and continues to the next row. One malformed record should not cost you the other 299. |
Tips to make it reliable
• Use named variables instead of hard-coded values — one workflow handles any spreadsheet with the same columns.
• Prefer Smart HTML selectors over fixed coordinates for web targets; re-capture if the layout changes.
• Add a short Delay between records so the target settles and the pace stays natural.
• Keep a result log so you can re-run only the rows that failed, not the whole file.
• Mark each row as processed after success so a re-run skips completed entries.
Frequently asked questions
How do I automate data entry from Excel without code?
Assemble visual commands — Data Source, Get Row, Declare Variable, and Type Text or Smart HTML — like building blocks, then loop them over your rows. No programming is required.
Can it enter data into desktop apps, not just websites?
Yes. Use Type Text and key commands for Windows apps, and Smart HTML for websites. Many workflows mix both — read a row once, then fill a desktop field and a web field from the same variables. For full desktop automation details, see the desktop bot guide.
What if my Excel file changes often?
As long as the column structure stays the same, swap the file freely — the workflow reads whatever rows are there. Adding rows is fine; renaming or reordering columns is what you need to avoid.
Will it work while I use the computer?
For web targets in background Chrome, yes — it drives Chrome over CDP without the real cursor. Desktop-app steps use the real mouse and keyboard, so run those when you are away.
Can it read from a Google Sheet instead of a local file?
Yes. Point the Data Source at a Google Sheet and the rest of the workflow is identical. This is handy when the data is maintained by a team rather than sitting on one machine.
How do I handle dates, currency, or leading zeros?
Settle on one format per column in the sheet, or normalize inside the workflow with Calculate and Clean Text. Store ZIP codes and account numbers as text so Excel does not strip a leading zero.
What happens if the run stops halfway?
If you mark each row as it is entered, restarting skips everything already done and continues from the first unmarked row. Nothing gets entered twice.
Is RunMacro free?
RunMacro offers a free trial. Current plan limits and pricing are listed on the pricing page.
Conclusion
Automating data entry from Excel replaces one of the most tedious daily jobs with a workflow that is faster, more accurate, and endlessly repeatable. Prepare a clean sheet, read each row into variables, transform the values you need to, enter the data by selector or keystroke, loop, and log. Once the basics work, add conditions and resumable marking to make it bulletproof.
Next, see how to auto-fill Google Forms in the background for a web-only version of this pattern, or extract data from websites to fill your spreadsheet automatically in the first place. If your Excel rows feed directly into web forms, learn how our form autofill solution speeds up web submissions. Ready to try it? Download RunMacro and build your first data-entry workflow today.